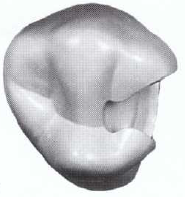
The difficulty of preparing a Lower Premolar comes in two reasons: first, the occlusal anatomy of this tooth varies a lot and so influences the shape of the cavity prep as well. The tooth is rather small with a large transverse ridge crossing buccolingually at the center of the tooth. The challenge is to how to make your isthmus width ideally small so that you can preserve the ridge perfectly.
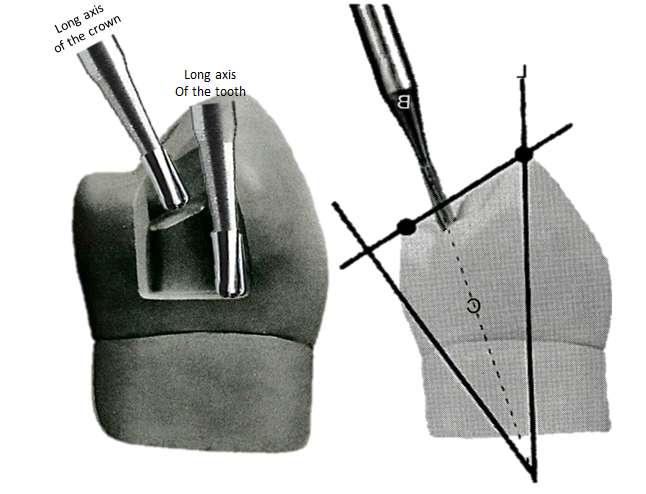
Second is that lower premolar teeth are known to be the most inclined teeth in the arch. So angulation of the bur should be strictly observed. This stems from the reason that making the occlusal floor of the cavity too parallel to the floor will have the risk of compromising the buccal pulp horns. Thus, with the pulp roof of the pulp chamber being lingually inclined, our occlusal floor should be parallel to this one as well. Creating this inclination would need that our burs should also be parallel to the long axis of the crown.
Careful visualization and planning should be done before starting the prep and always stabilize your hand rests at all times.
Anatomical Variations of the Occlusal Aspect of Mandibular First Premolars
Add Video Explaining OCCLUSAL Variations of Mandibular First Premolars on two types of typodont HERE
The lower premolar has a very unique anatomical feature which includes 3 variations of occlusal anatomy and it has the most severe lingual inclination among the posterior teeth.
Add video here
Lower First Premolar Occlusal Designs
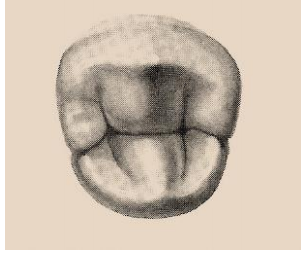
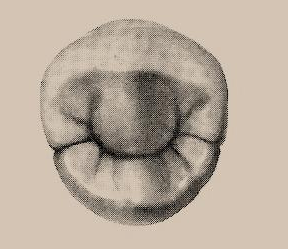
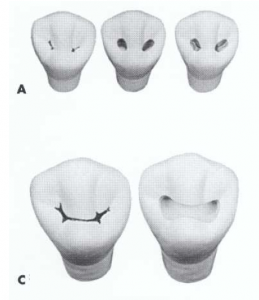
Usually, the occlusal form of the lower first premolar in which most typodonts have is the U or H shape configuration. These take form as two separate distal and mesial fossae (pit) with a prominent transverse ridge intervening between these two structures. There is a grey definition of what the ideal form will be on this surface, and also it depends on the requirements of the program or if there aren’t any then it will depend on your decision. Anyway, there is the conventional and the conservative technique.
The conservative technique deals with the transverse ridge intact whereas the conventional technique, the two distal and mesial fossae are connected, thus it takes form as butterfly in shape just like a class 1 upper premolar prep. Whatever design that you will execute in the test, it is completely acceptable, however the conventional technique will definitely demonstrate your skills and knowledge better than the other one.
To illustrate the difference, refer to these photos below. These are taken from The Art and Science of Operative Dentistry.
Preparing MO Surface
It gets complicated when preparing for the mesial aspect of a lower first premolar tooth. The MO surface is within the esthetic zone so the buccal walls should not be extended too much otherwise the margins of the amalgam will show when the patient smiles. In this case, there are times when there is a need to keep esthetics the conventional rules will be either modified or be over-ruled.
Add video here
The angulation of the pulpal floor of the occlusal prep and the gingival floor of the proximal box is actually NOT parallel with each other. Because making it both parallel will risk the entire buccal wall (or parts of it e.g. bucco-gingival line angle) to be over extended more buccally which may expose amalgam margins.
So to as to still create an even floor and be able to break the buccal contacts, change your bur angulation to a slightly upright position. So your aim here is to ONLY break the contact area and thus will prevent you from over-extending your prep away too much buccally from the contact area. Sometimes, the buccal wall will conform to a rather upright or in a slight angle leaning lingually, which is totally fine, as long as your lingual wall is converging towards it.
Do not worry yourselves too much about the buccal wall whether you had create a convergence or not because inherently if you just only maintain the bur angulation, the wall will just follow the sides of the 330 bur. So ALWAYS maintain your bur angulation and that’s it, the wall will just naturally form a convergent wall for you.
Take note that the mesial contact area is located narrower compared to other posterior teeth because it is adjoining with the canine. So naturally, if this is the case we keep the buccal-lingual extension of the proximal box be limited but not too narrow because the amalgam is going to be too weak. We are going keep the buccal wall extended as minimal as possible but the lingual wall should be extended more for about half a millimeter to give the amalgam the right bulk. Then the proximal box should have at least 0.3-0.5mm clearance from the canine.