When doing an occlusal reduction, you have to keep in mind to reduce tooth structure to make a space for the future crown but still preserve the anatomy of the occlusal table. Which means that the final look of the occlusal table should have the high and low areas of cusps without ever changing their location and still maintained the location of the major grooves. The risk of making the table flat is that the whole preparation will be short thus lessening the retention form of the crown.
So to repeat, the main objectives of occlusal reduction are:
- To create an even space for the crown material
- To keep the anatomical landmarks as they were
A common problem in doing occlusal reduction when you are very focused on preserving the anatomy and totally neglected to actually reduce it. You have to know your priorities. It is rather more important to have occlusal reduction sufficiency than conserving the occlusal anatomy. If you are just beginning to get in hand with crown preparation, focus first on how to create a good clearance from the adjacent and later practice how to perfectly conserve the anatomy. To achieve both of those features, know your depth cuts. It needs to be perfect from the start (from its location to the right depth) before you actually reduce the occlusal table.
Measurements
This is one area each program will have different depth requirements. But once you know how to do a nice occlusal reduction, whatever the program asks of you it will be very easy. For demonstration purposes, we will base our measurements in the Fundamentals of Fixed Prosthodontics. It says:
FOR Gold Alloys, there should be 1.5mm of clearance on the functional cusps, 1.0mm is sufficient on the nonfunctional cusp.
FOR metal-ceramic crowns will require 1.5 to 2.0mm on functional cusps and 1.0 to 1.5mm on nonfunctional cusps.
FOR all-ceramic preparations, there should be 2.0mm of clearance on all cusps.
Based on this guidelines, for both PFM and FGC, we can reduce 1mm on the nonfunctional cusp and 1.5mm on the functional cusp. Most programs will ask for more than 1mm of reduction on the nonfunctional cusp of a PFM. Unless it is otherwise indicated in the guidelines, these would be the measurements:
FGC: 1mm nonfunctional, 1.5mm functional
PFM: 1.3mm nonfunctional cusp, 1.8mm functional cusp
Placing Depth Grooves
This video shows you the principle behind placing depth grooves (or depth cuts).
Add video here
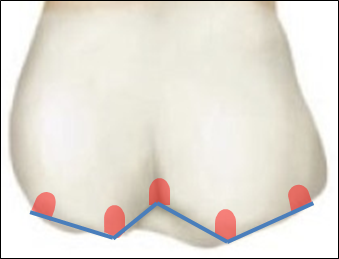
Depth grooves are very important in indicating the previous location of your important anatomical landmarks such as the cusp tips and grooves. It allows you to visualize your expected high and lows of your prepared occlusal table. Setting up depth grooves will allow you to plan how much of tooth structure you will be reducing. So when you give depth grooves, it must be as accurate as possible because this will dictate the actual form of your prepared occlusal anatomy.
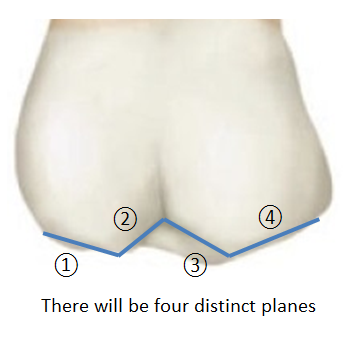
Before starting, observe the anatomy. For example, on molars, there are four planes, take note the high and lows of the cusps.
Next, you need to first visualize the angulation of your bur. Rest your bur along the slope of the cusp, making sure that it is parallel. This is critical because you have to maintain the shape and inclination of the cusp as you reduce it. A common mistake is to make the angle of the bur that is too steep and the tip rests on the central groove. This will make uneven reduction and it seems you will be poking on the central groove making this area a whole lot deeper than the rest of the cusp area.

As you put depth grooves, maintain the bur angulation and double check your inclination You can have the adjacent tooth as your reference. Always check if you have achieved the correct depth with the use of a Williams probe or with the diameter of the bur itself (0.9mm #56 bur) You need your depth grooves to be as perfect from the start because this will will be your guide to create the correct placement of planes and grooves for occlusal reduction. Without it, it will be very difficult to check if whether you have reduced it to a correct amount and if whether or not you have maintained the anatomy of the occlusal table.
Of Connecting Depth Grooves
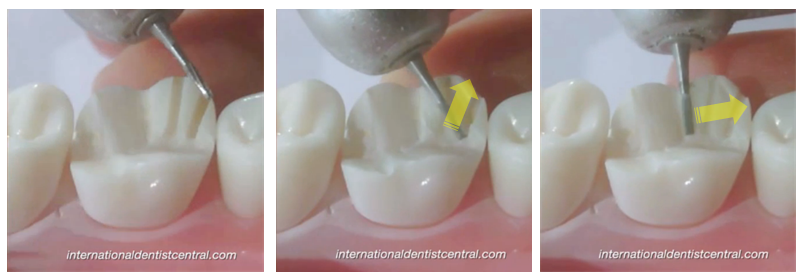
All you have to do is to connect the depth grooves, materializing the planes that you have planned before. Remember to connect the bottom of the two depth grooves to create a distinct and even plane without any remnants of the previous depth groove.
One of gravest mistake is to loose the direction of the slope and loosing the highs of the cusp (making them flat). To avoid loosing the anatomy, take one slope at a time, connecting 2 depth grooves at a time. Practice first with a still bur, moving it along the slope before stepping the pedal to reduce it.
While reducing, take note not to let the bur slip into the pre-established depth groove. Remember that you need this for reference. Slipping your bur into the depth groove will deepen it more and will loose your established depth. So to prevent this, the direction of your reduction should be from bottom of the cusp to the cusp tip and in sweeping, brushing motion. Position your bur slightly mesiodistally, crossing to the direction of the slope but still maintaining its degree of angulation. Not only this will prevent slipping into the groove, the reduction is faster and more efficient. When you reduce it to some extent, this is the time when you angulate the bur parallel to the slope, making a nice even plane.
Functional Cusp Bevel
One thing that under pressure applicants frequently forget to do is the functional cusp bevel. Seriously, it doesn’t come naturally to many of us. I made an explainer video to show you why without that you can’t get adequate occlusal clearance to help you remember to do it, every single time!
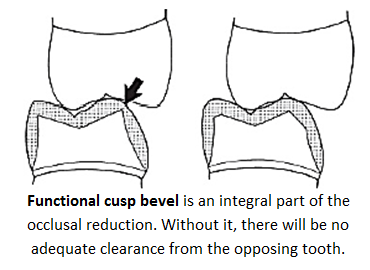
On the upper molar teeth, the functional cusp bevel lies on the lingual cusps while on the lower molar teeth, it is on the buccal cusps. The width of the functional cusp bevel is kept at 1.5mm, a little bit smaller for the premolars. However, it also actually depends on how good your axial reduction was. So giving a specific number for the width of the functional cusp bevel is not a good idea because you may have to look your axial reduction and how it relates to your opposing tooth.
Add video here