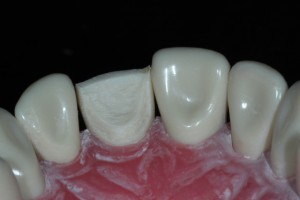
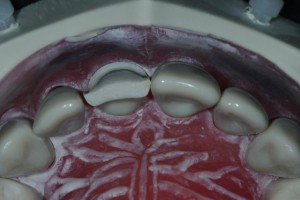
The thickness for the metal is 0.7mm on the lingual surface. This means that most of the time after lingual surface reduction is finished, the clearance with the lower anterior will be more than 0.7mm if there was space to start with. #9 is a good reference to keep – make your clearance (0.7mm + the amount of clearance #9 has with it’s opposing).
To check for clearance, bring your typodont to centric occlusion (bite) and check for space. If there is none, keep reducing it until there will be an adequate space for the metal.
Step by Step
Step 1: Visualization
It’s pretty hard to do a depth groove in this area but you can reduce this area without depth grooves anyway. Just use a football or an egg shaped bur. The shape fits perfectly to the concavity of the lingual fossa.
You may not measure the reduction in this area accurately. So to be sure, you may reduce the mesial half first, then duplicate your reductions to the distal half. This way you can double check to prevent any over reduction.
To check for clearance with the opposing tooth, always bring your typodont to occlusion every now and then.
It is a common mistake to loose the cingulum. The best way to do it is to make your bur angulation same as the angulation that you did on the gingival half of the labial surface. You may practice doing angulation first before stepping on that pedal!
Step 2: Reduction of Lingual Fossa
Insert VIDEO here
In the case I was preparing for the photos, I actually gave a little depth groove and it worked really well. I intentionally gave the depth groove off-center to the mesial, then reduced the mesial half first keeping the distal half as a reference, then matched the distal half with the mesial half.
When reducing the lingual surface, give special attention to the cingulum. It’s super easy to over-reduce the cingulum which will result in reduced height of the lingual wall. No Good!
Step 3: Lingual Wall Reduction
This is a very short wall that needs a nice chamfer margin. You can’t really give depth grooves here, so before prepping make sure to get your handpiece angled right, which is more like the same as the angulation of the gingival 2/3 of the labial surface. Don’t make any undercuts, so double check with the gingival part of the labial wall!


Make sure that the margins follow the contour of the gingiva.
