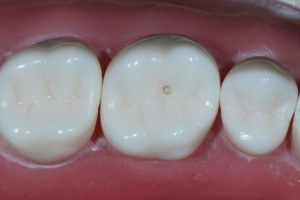
The occlusal segment is separated into two parts, Mesial and Occluso-lingual, with an oblique ridge in between them. Compared to the the lower first molar, this tooth is relatively difficult to prepare because the tooth area is smaller, the prep is divided into two small parts, and you have to use indirect vision. Anyway, we are here to give you step by step guidelines on how to do it.
This section includes doing the cavity preparation on the mesial section together with the proximal box.
Step by Step
- First visualize the grooves and, if necessary, plot in the location of your punch cut.
insert video here
Start practicing the angulation of your bur first. The upper first molar is slightly buccally inclined. So before doing the punch cut, line-up your bur along the long axis of the crown. That’s the angulation you want to keep throughout.
- Do the punch cut. Start-off with #330, include the central fossa with the edge of the bur and stay while staying away from the oblique ridge as much as possible.
insert video here
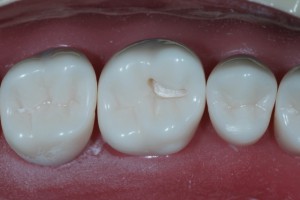
- Extend buccally and mesially. Notice that the outline form is like an “L” shape. Don’t worry about the narrow width yet, we’ll get to that after finding out the outline form of the box.
- Flatten and smoothen out the floors. Use #56 or you may try using #556
insert video here
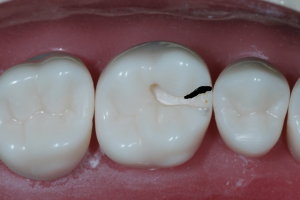
- Visualize the proximal box. Visualize the contact areas and with an explorer. Plot in the extent of the buccal and lingual walls of your proximal box. This will be your future exit points for your proximal box. Mark this in such a way that when you extend until that area, you should have a noticeably broken contact.
insert video here
- Make the occlusal shape of the box but without extending it deep gingivally.
insert video here
Note that the lingual outline will be relatively straight. After finding the extent of the box lingually, connect the lingual outline form to flow. If your isthmus is narrow, use this to widen it until the lingual outline is nice and smooth but no more; you don’t want to dig into an intact ML cusp. Nowhere should the extent of this wall be more lingual than the lingual wall of the proximal box.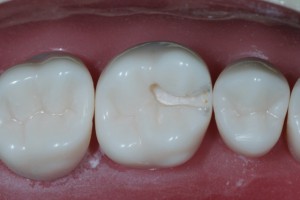
If the isthmus is still narrow afterwards, it can be reduced from the buccal side. - Give a reverse S curve on the buccal
insert video here
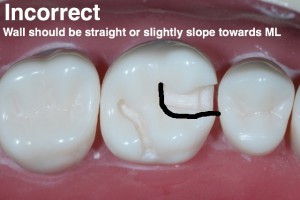
Area marked in black is reduced to give the curve. Remember the buccal and lingual walls of the box is straight, and the curve starts distal to the box on the level of the pulpal floor.
- Check the box depth gingivally, give a punch cut somewhere in the middle, then extend buccolingually to connect with the buccal and lingual walls.
insert video here
Go all the way until the walls are connected. Make sure that your bur is still angulated in relation to the inclination of the clinical crown.I used a #330 for the punch cut and extended buccolingually with a #56. Or you may use a #245 for the buccolingual extension, then use #56 to smooth floors and widen the gingival floor. Then you will get this result:

Finishing of the Proximal Box
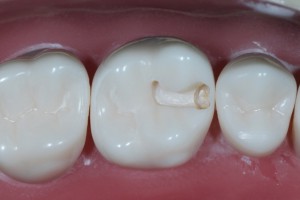
- Thin-out the M wall of the proximal box
insert video here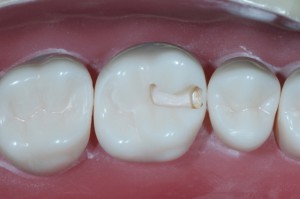
I’m using a #245 for this. Tackle the buccal and lingual corner of the shell. Take note that you must extend the prep further than the walls that you had already made. Then, assume that the shell will fly away at any minute and be prepared for that with a super strong finger rest.Do this until the shell is perforated on the buccal and lingual side with the center portion of the shell left intact. With the use of the explorer, pass it through the hole, and you can double check the extent of your future gingival floor.

- With the shell still in place, you can make adjustments of your proximal box such as widening the gingival floor or extending the buccal-lingual walls of the proximal box if still inadequate.
add video here
This is a great opportunity to do everything while there is still a shell to protect the adjacent tooth. - Break off the walls with your hatchet

Place your hatchet at the location and direction of your desired walls. Don’t over-flare the walls, that’s irreversible.Use the hatchet to define the angles of the box; this can only be done by a hatchet. Any bur has a rounded cross-section, which leaves rounded axiogingivobuccal and axiogingivolingual point angles.
Also place a bevel on the gingival floor and at the axiopulpal line angle.
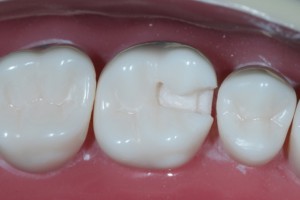
Now, your MO section of the upper first molar is finished!