The first thing to keep in mind when doing a crown preparation on a lower molar is the angulation; the line of draw for the crown follows that of the lingual angulation of the clinical crown. So just like working on a class II preparation, the angulation of the bur needs to match that of the crown.
Regarding distal cusps, it will eventually be gone when you reduce the interproximals. Also, it will just be obliterated when you place a depth groove here. Saving it still will have a tendency to encroach the distobuccal cusp in which will greatly interferes with the occlusal clearance. It is not worth it to conserve it, So just ignore it. It will not give you additional points when you save it anyway.
Step 1: Visualization and Angulation of Bur
Most important things to keep in mind: (1) Lingual tilt of the crown, (2) Distal cusp will be lost afterwards (3) No oblique ridge (4) Functional Cusp is the buccal cusps.
Add video here
Step 2: Placing Depth Grooves
Demo video
Demo video
Give the depth grooves, you may put depth grooves for the functional cusp bevel as well.

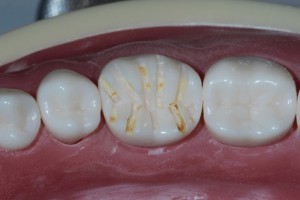
Be careful not to over reduce nor loosing the location of the central groove. Avoid resting your bur on top of the central groove, move a little bit away that your bur rests on half the length of the slope. If the central groove happens to be off center, it will not coincide with the opposing tooth thus you will not gain clearance from it.
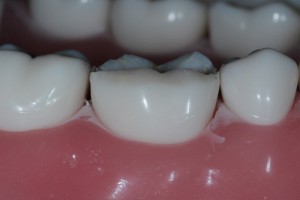
Step 3: Connecting Depth Grooves
Demo video
Same principle goes here, take two grooves at a time, connect them and make an even plane. After that plane, proceed to the adjacent plane. Doing one plane at a time will lessen the chance of your cusps to become flat.
Bur should be in sweeping motion starting from the base of the cusp towards the tip of the cusp. Preserve the anatomy as much as possible and maintain the configuration of the grooves as well.