- Dovetails (not fishtails)
- Parallel buccal and lingual walls
- Retention grooves in the proximal box
Dovetails
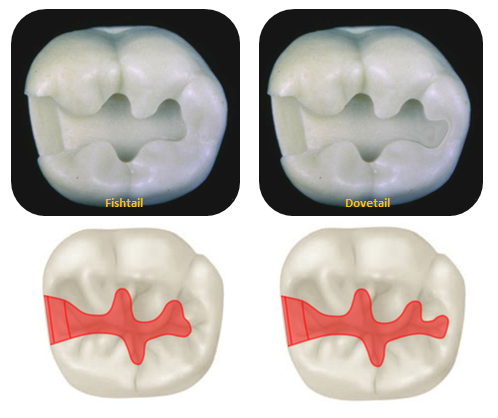
UOP will not ask you to prepare for a fishtail but instead a huge dovetail at the distal end. So a fishtail is rather seen as like having two buccal extensions of the outline form that wraps around each cusp, right. So with this you could preserve the distal and distobuccal cusp at the same time. But unlike what UOP is asking from you is different because there is only one buccal extension and a very big dovetail at the distal. So when you see it from occlusal down it is like the outline form of that of a lower second molar tooth.
So simply speaking, this kind of prep places the whole dovetail entirely on the distal cusp, in which you are actually ignoring and not preserving that cusp. In a sense it is an easier prep because you have no problem in preserving that little distal cusp. But the tricky thing here is about how to place it perfectly.
When you make that dovetail, there is NO good reason to place the prep center to the distobuccal groove because if you do so, the whole dovetail will appear to be so awkward and really giant. Also, since it is too big already, you will definitely be afraid to extend more to cover the distal pit.
So a good way of doing this is that since there will be no good reason to preserve the distal cusp, you are free to move the prep distally than the ideal. So include the distobuccal groove only with the edge of your bur. In this way, you are free to move distally while not making the whole dovetail very big and you shall cover the distal pit as well.
Parallel Buccal and Lingual Walls
The prep can only be one of three things: Convergent, parallel or divergent walls. Usually most schools ask for a convergent, UoP ask for a parallel but regardless of what school you are in a divergent wall is a very grave mistake when doing class II preps.
Most likely the mistake that you will encounter here is that it is very easy to make your walls divergent instead of making it parallel. Also, when you have not perfected the way how you control your hand skills and stabilizing it according to the long axis of the crown, you’ll definitely will encounter some problems here. A slightest tilt of your bur will make it divergent. If ever you are going to have a mistake, you must yield to a prep that is more convergent, not a divergent one.
Moreover, there is a tip for making parallel walls. First use a 330 bur to make your punch cut and initial outline form. Naturally, your walls are still convergent because of the inverted cone shape of this bur. Now next is to grab your NO. 56 bur. This bur creates parallel walls. The objective here is just to make your walls convergent to parallel, passing through the reduction that you have done with that of the 330 bur before. Always and always remember to have stable and rests and the angulation of the bur is still parallel to the long axis of the crown.
The diameter of a no. 56 bur is 0.9mm so with that bur you can approximately create the ideal 1mm isthmus width.
[ insert video here ]
Retention Grooves
Retention grooves are placed on the axiobuccal and axiolingual line angles of the proximal box to provide additional retention for this kind of prep. In textbooks, retention grooves are made using a 169L but however, we do not recommend using that bur because the size of it is too large anyway compared to the retention groove that they will require. Also, you will run a very huge risk of destroying the entire line angle and walls rather than making a nice groove. Actually, creating that groove isn’t that overly exaggerated as you think it should, it is not evidently seen but rather felt with an explorer that there IS a groove there. As long as there is a catch or a feel with the the tip of the explorer, that is enough. So we recommend to use a gingival marginal trimmer to CARVE it out.
First, you have to make sure that the line angles of the proximal box are sharp so that you will have a clear picture on where to put it. To achieve this, you will use a hatchet to trim down to make a definite buccal (or lingual) and an axial wall. All of the walls should meet in a very sharp line angle. Next with the sharp corner tip of the GMT carve out the groove with the greatest pressure at the the bottom and softening the pressure as you go occlusally. This way, the groove will have a deeper dimension at the gingiva and it fades away (narrower) occlusally.
The shape is not critical but the angle of how it is placed is more critical. When you imagine in an occlusal view, the groove is placed within the walls and positioned diagonally from the line angle. So definitely the tip of the GMT blade should be angled in this way too, pointing directly towards the line angle. To check for the groove, the tip of the explorer should let you feel a SUBSTANTIAL catch.

[ insert Michael’s Video (Re: Retention Grooves here]