Just like cavity preparations have names for its specific areas or surfaces (e.g. line angles, point angles), there is a separate set of nomenclature for crown preparation. This nomenclature will help us avoid any misunderstanding when we want to point out or describing its parts.
Typical Crown Preparation
There are various forms of crown preparation but share a common definition of parts. Take note that depending on what crown prep that you will make (e.g. whether it is for full metal crowns or porcelain fused to metal crowns) they just differ on measurements/dimensions and the type of finish lines.
Finish Lines
Others would call it as a Margin, it is the boundary surface of the tooth preparation. The type of finish line depends on the material of the crown because a certain material needs to have a basic requirement of bulk and how it should adapt to the margins of the tooth. There are 2 basic forms of finish lines that you need master in the bench test: Chamfer and Shoulder. Other margins, which will be specified according to what school you will be in, is actually a modification from these two types of shoulder. Once you have mastered those two, you will definitely know how to do the rest.
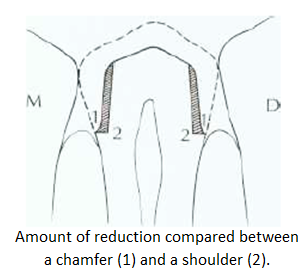
CHAMFER: There is minimal reduction in this type of margin and the angle is more rounded and narrower than a shoulder. This is suitable only for full metal cast metal crowns (e.g. gold) because even if the material is thin, it is still resilient/strong. Also, the configuration of the angle of this margin exhibits minimal stress to the tooth. We recommend that you first start practicing with this kind of finish line because it is easier.
SHOULDER: There is more reduction in here and the finish line has a well defined angle instead. This is for all ceramic crowns and PFM because the material needs to have adequate space for both metal and ceramic, and this brittle material needs to be thick enough to withstand fracture.

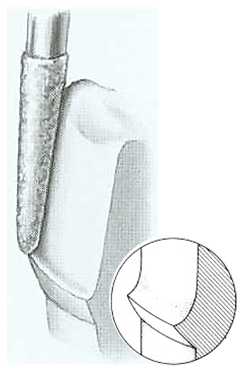
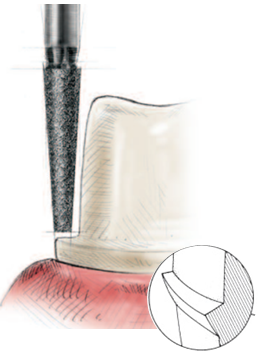
Making a chamfer and a shoulder needs to be dependent on the shape of the bur that you must be using. To be more in depth of this topic, refer to the “Basic Instrumentation” section.
The location of margins is usually at 0.5 to 1mm supragingivial. When margins cannot be cleaned properly by the patient, this is will be an avenue for caries formation. The best way to do this to place the margins above the gingiva where it is more cleansable.
LINK
Occlusal Reduction
This is the quantity of tooth structure to be removed for you to have adequate restorative material between the occlusal aspect of the restoration and the opposing tooth. This is very crucial because the amount of reduction will depend on the material that will be used.
There are many errors that could go in here, one is that if you under reduce the occlusal surface, the lab will have a hard time creating the anatomy of the crown and thus they will over contour it a little bit to provide bulk. This is a big no-no because it will change the occlusion of the patient. The other one is that if you over reduce it to such extent that is more than the minimum measurement, you will likely to expose the pulp horns and reduce the resistance form of the tooth.
So there are two crucial points to look for with occlusal reduction: (1) conserve anatomy, and (2) give appropriate reduction.
This is one area each program will have different depth requirements. But once you know how to do a nice occlusal reduction, giving the depth the program asks for becomes easy.
In The Fundamentals of Fixed Prosthodontics, it says:
For gold alloys, there should be 1.5 mm of clearance on the functional cusps (lingual of maxillary molars and premolars and buccal of mandibular molars and premolars) Not quite as much is required on the nonfunctional cusp, where 1.0 mm is sufficient.
Metal-ceramic crowns will require 1.5 to 2.0 mm on functional cusps that will be veneered with porcelain and 1.0 to 1.5 mm on nonfunctional cusps to receive ceramic coverage. There should be 2.0 mm of clearance on preparations for all-ceramic crowns.
If you go to a program that doesn’t release guidelines, this is what I would do: FGC: 1mm nonfunctional, 1.5mm functional
FGC: 1mm nonfunctional, 1.5mm functional
PFM: 1.3mm nonfunctional cusp, 1.8mm functional cusp
To do a conservative preparation, reducing the occlusal surface to mimic the natural tooth is crucial. With that we can provide adequate strength for restorative material and keep the tooth structure nice and strong.
Functional Cusp Bevel
One thing that under pressure applicants frequently forget to do is the functional cusp bevel. Seriously, it doesn’t come naturally to many of us. This is important for an adequate occlusal clearance in this area to allow more bulk of the material and for optimum contour of the cusp anatomy. The amount of reduction of the functional cusp bevel depends on the type of material to be used.
Add video here
The functional cusp is the cusp wherein the occlusal force applied on to the area is at the most. This area needs more reduction to allow thicker material to be placed here so that the crown can resist fracture. The functional cusps are: (1) lingual of maxillary molars and premolars and (2) buccal of mandibular molars and premolars.
Labial Reduction (Anterior)
On the labial surface of an anterior tooth, there are two distinct planes that needs to be seen, (1) cervical plane, which parallels to the long axis of the tooth, and (2) the incisal plane which follows the normal facial contour. This is very important for conservation of tooth structure, correct form of the anatomy of the crown and so that the opaque substructure will not show through.
If only one plane is reduced, opaque porcelain may show through (b), which makes the color of the crown unnatural. So the lab would compromise and make this part thicker than normal making this part bulkier and even more unnatural looking (c).
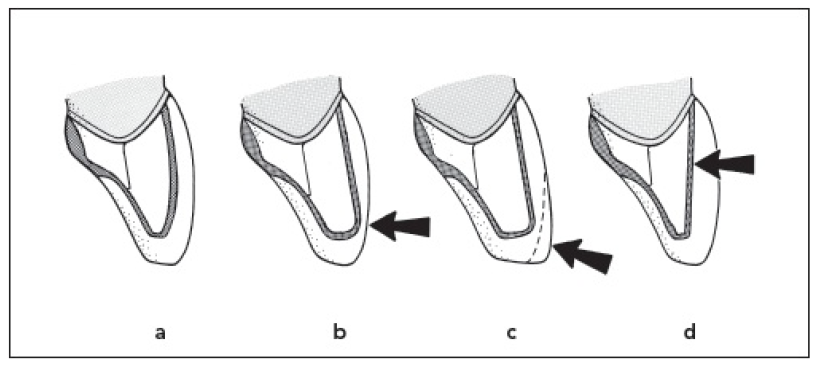
If it is over reduced, the pulp may be encroached upon (d).
Path of Insertion or Line of Draw
It is an imaginary line along which the restoration will placed and removed from the prepared tooth. This means that the crown should never have under tapered or undercuts on its axial walls that will prevent proper seating of the crown. To avoid this, the walls should have adequate taper on its walls. This path of insertion is determined mentally by the operator; through imagination of how the crown is placed or removed on the tooth. On tip though, if you look your prepared crown occlusally, you should be able to see all of your margins clearly, and when looking buccally or lingually, it should have clear an obvious taper and clearance from the adjacent tooth. This is more likely that you will achieve a good path of draw. It may be difficult at first, but with a lot of practice you can understand the path of insertion better.