Burs, especially diamond burs can be confusing. So many different types, grits, and even numbering systems are out there. Just a tip though, the first three numbers on the left indicates the shape of the bur and the three numbers on the right determines the size (the larger the number means larger in diameter).
However, No need to get too tied up into numbers, burs are just the method we use to reduce tooth structure and do the preparation. All that matters at the end is what the final preparation looks like, not what burs were used. Also, the tip of the bur will determine what the final look of the margins will look like, so keep that in mind. No matter what ever bur you will use you only have to make sure that the angulation of your bur is totally perfect and your prep will be nice.
Below we’ll go through the commonly used burs and the burs that are predictably reliable for crown preparations. If you bought burs that are different from the burs indicated here or whether you are given with different burs in the bench test, it is always advisable to check the shape of the tips and use a perio probe or #330 bur to measure it. Always check your bur if it is proper to use to a certain margin that you want to do before actually using it.
Also, no two dentists will recommend the same set of burs, so you may not strictly follow these guidelines and you are open to experiment until you discover what bur works best for you.
On Tapered Burs
In textbooks, parallel burs are still even being showed to prepare the axial walls of the crown. However, nowadays it is advocated to have a slight taper along the walls (about 3 to 4 degrees, 6 to 8 degrees all in all), this is to achieve adequate draw and installation of crowns, also for ease of taking impressions without distortion of the impression material. This tapered walls could be done with a parallel bur but needs to be very reliant on the angulation skills of the operator. This often leads to high chances of operator errors such as undercuts or no draws of the prepared crown. To remove such operator errors, crown prep burs nowadays are tapered. So angulating the bur when reducing the axial walls are not of a problem anymore as long as the bur is positioned along the long axis of the crown or along the path of draw.
Color Coded Burs
Diamond burs are have colored strips at their shank indicating their grit. Black (Supercourse), Green (Course), Blue (Medium), Red (Fine), Yellow (Superfine), White (Ultrafine). The greater the course, the faster it cuts tooth. Most likely, you will be given a green coded bur or a red coded bur.
Diamond Burs VS Carbide Burs
Carbide burs leave a smooth surface while diamond burs leave a rough surface. Diamond burs are used on crown preparations because we want to have that rough surface. This surface creates the right interface so that the cement can have something to hold on to. It creates friction that prevents the crown from slipping off. So, in a way, this rough surface helps to enhance the retention form of the crown. That’s why we do not polish our crown prep after.
Occlusal Reduction
You may use any cylindrical bur but we mostly recommend a #556 bur which has more serrations that cuts tooth better and faster. Most would rather use #56 bur which they used from doing cavity prep. They do have the same dimensions, but it cuts inefficiently that it leaves a burning mark on the surface of the tooth. If you are buying burs, buy #556 for crown preps and it will make your life easier.
Add video here
A tapering bur is not recommended because occlusal reduction needs to have a uniform reduction all throughout the high and lows of the cusps. A tapering bur could not do that simply because the tip will create a lesser reduction than it is nearer on the shank. Also, you have to be more critical in angulating your bur when you use a tapering bur.
Though there are some programs that would possibly hand you only diamond burs like a chamfer or a shoulder bur, so you have left with no choice but to use it. It could be done so, but you need to be more conscious about bur angulation and accurate depth cuts. Just remember to first make your depth cuts to be as accurate as possible before reducing the occlusal table.
Finish Lines
FOR CHAMFER: chamfer margins accommodate full metal/gold crowns, and lingual margins of metal-ceramic crowns.
Add video here
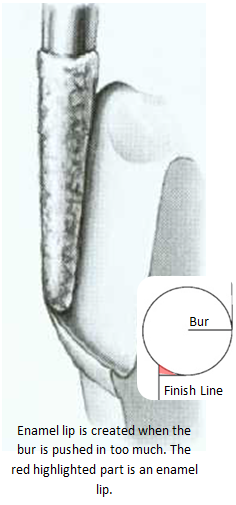
Use a 856-014 bur (d=0.9mm) or 856-016 (d=1.1mm). The only difference between them is the diameter of their tips. Some would rather not use the bigger one because it so intimidating. But it is up to you. Experiment on both burs and check whichever bur suits you the most. Whichever bur that you will use, the most critical thing that you must consider is about how you use it. For creating a nice chamfer, it is a very good habit if you do not fully engage the whole shape of the bur. Always make sure that half of the diameter of the bur is outside the margins. This is because:
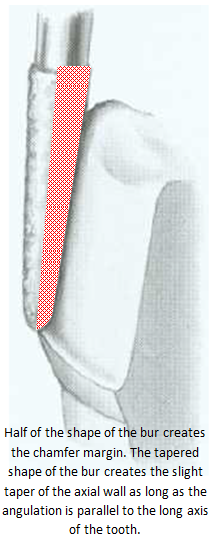
- Chamfer width is only at 0.5mm. Half of the diameter of the bur will just be enough to create that width.
- High chance of creating enamel lips when you fully engage the whole diameter of the tip. This unsupported enamel is a very grave mistake in the bench test. Also, in this manner you are more likely doing a deep chamfer already.
Some may suggest an 878K-016 or also known as a gingival curettage bur or torpedo bur. It has a pointed tip. The disadvantage to this is that the tip can scrape across the gingiva, gouge the margins and high chance of making enamel lips.
FOR SHOULDER: Shoulder margins accommodate porcelain crowns and buccal margins of metal-ceramic crowns.
We must use a bur with a flat tip, with well defined corners like 847KR-016 bur or Flat-end Tapered Modified. The diameter of this bur is 1.1mm which is perfect because shoulder width should have 1.2mm. On using this bur, the whole shape of the bur should be fully engaged within the margin.
Other programs would present you chamfer burs to make a shoulder for porcelain/metal-ceramic crowns. Well, classically, it should be a shoulder, right? However, there is nothing wrong about this. These programs are actually teaching students of a more up-to-date method of doing a crown preparation. Their reason is that in a real clinical setting, a clinician is more likely not to make a perfect shoulder; they are more likely to produce a clinically acceptable shoulder or, in some ways, a deep chamfer. And recent materials can accommodate these margins but it should be still a requirement that the reduction is thick so that the material can have an adequate bulk. So if ever you are given a chamfer bur, do not worry, use it as if it is a shoulder bur, provide the same amount of reduction, and always, always remove any unsupported enamel afterwards (you may use hand instruments).
Finishing of Margins
An End Cutting Bur has an advantage of finishing a shoulder margin without touching the axial wall. The less aggressive option is to use hand instruments that you have been using in doing cavity preparation.
Add video here
Proximal Reduction
Using a needle shaped bur to break the contact is effective because it avoids nicking of the adjacent tooth. A 859L, 820-012, or 169L bur will do.
Add video here
Anterior Lingual Reduction
The shape of the lingual portion of the anterior teeth is spoon shaped or it caves in. A better way to reduce this part is to use an egg shaped bur. A football shaped bur on the other hand has a pointed tip that may gouge the cingulum.
Add video here